
The Adobe suite allows you to perform endless functions for the creation of digital products. Among them we have the option to vectorize, which is usually worked in the Illustrator program. But if you have a basic package from Adobe, don’t worry! In this article, we’ll teach you how to make vector line art with photoshop.
Some Photoshop tools will allow you to draw vector shapes from scratch, it is also possible to select paths within this software. In other words, there are different ways to learn how to make vector line art with photoshop . In this article we will focus on transforming a photograph into vectors in which color predominates.
Table of Contents
- 1 What does it mean to vectorize an image?
- 2 What is a vector image?
- 3 What are the advantages of vectorizing an image?
- 4 Why vectorize an image in Photoshop?
- 5 Prepare your image in Photoshop
- 6 How to select in Photoshop?
- 7 Turn your image into an illustration
- 8 How to make a path in Photoshop step by step?
- 9 How to vectorize in Photoshop?
- 10 How to change colors in Photoshop?
- 11 How to import to Illustrator?
- 12 What are the most common vector formats?
- 13 How can vector images be used?
- 14 Final tips
What does it mean to vectorize an image?
If you came to this article, it is because you are interested in or familiar with graphic design, so before teaching you how to vectorize in Photoshop, we are going to explain some basic concepts that will be of use to you later.
So let’s start to explain that vectorization consists of transforming an image that is made up of pixels into another made up of vectors. This transformation is achieved by drawing all the outlines and fills of the selected image through Bezier curves, resulting in images with perfectly defined outlines.
Bezier curves are used to trace the drawings through 2 defined points, which are going to be joined through a smooth curve and anchor points, known as “nodes”. During the process of vectorizing the image, it goes from formats such as JPEG or PNG to the vector version that is SVG, EPS or EMF.
Vectorization can be applied to logos or other images previously drawn, photographed or printed, it can be mascots, isotypes or names with old letters whose typography no longer exists or cannot be found.
To develop a vectorization, elements such as the following can be used as a starting point:
- A scan.
- A picture.
- A printed.
- A photocopy.
An important point that you must be clear about is that not all images can be vectorized (photographs that have many details or if there are people and animals). On the contrary, logos and cartoons are recommended and ideal.
Ok, so good so far but now: what does it mean to have a vector image or why is it important?
What is a vector image?
Vector images are made up of geometric objects, lines and curves that are defined by mathematical attributes, which provide information about their color or position.
The main characteristic of a vector image is that it never becomes pixelated, that is, if you can enlarge it to an exaggerated level, it will not lose its quality or sharpness.
Vector images are free of any type of distortion, whether you move, stretch or twist them, their quality will not change, because even if the image is manipulated, the vector format will calculate the connections between the points and return a new image, as clear as the previous one.
This is something that does not happen with bitmap images, because they use rows and columns of pixels of different colors that reproduce an image.
These images are also known as raster images (with JPEG or PNG formats) and are highly dependent on resolution. So, if you need to resize it (either smaller or larger), that process will cause the pixels to be removed, and when you want to return to the original size, the image will be distorted.
This format is ideal for creating elements such as the following:
- Illustrations.
- fonts.
- Brand images.
- Graphics used in 3D and video games.
This makes them ideal for all printing systems, which is why it is important that you learn how to vectorize in Photoshop today.
Vector images are especially used in topics such as:
- Serigraphy.
- Embroidery.
- Labeling.
- Engravings and large format prints (billboards, for example).
This is the preferred image style for designers, especially when it comes to vectorized logos .
What are the advantages of vectorizing an image?
You already know that the main quality of vectorized images is that they do not lose quality when their size is changed, but there are other advantages to doing so, which we will detail below.
-
Little storage space
It is true that the size or storage space it occupies will depend on each image, but one point to note is that vector images take up less space than bitmap images.
-
It is possible to animate them
Some vectorized images can be animated , although it will depend on their format. Sure, it would be something simple like rotation and translation movements.
-
Son editables
These images can always be ready to be edited, they just have to be saved in the corresponding format, so be careful not to do it based on pixels.
This means that if you save the file as a vector, on another occasion you will be able to modify it, either to change its color or size.
-
They merge
Another advantage of the vector format is that it allows one vector to be related to another, which means that they can be grouped, intersected, and then separated again.
Although saving the file in vector format will also help when printing, since it will allow you to scale it and increase its size in an unlimited way, added to the fact that it will be possible to work with different types of printing.
Why vectorize an image in Photoshop?
It is true that in this post we will talk about how to vectorize an image in Photoshop, but there are also other software with which this process can also be carried out. In fact, another of the most searched topics on the internet is how to vectorize with Illustrator .
However, it should be noted that if it is about image design or editing, one of the programs that cannot be missing on your PC is Photoshop.
With Photoshop, you can make multiple types of images, from GIFs, photomontages or your own editions. Being a program specialized in photos, it is ideal for editing and retouching any type of bitmap image.
But that’s not all, you can also use Photoshop to draw and paint digitally, illuminate photos, change colors and create images that go directly to a web page.
This is why we consider it important to learn how to vectorize an image in Photoshop, because you will have a new skill that will be of great help when you carry out a project for a brand or company.
Prepare your image in Photoshop
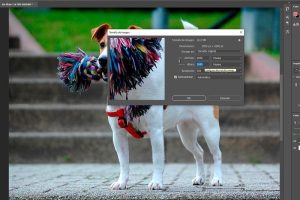
Before learning how to vectorize in Photoshop step by step, you have to improve the resolution of your image, so that it is in the most optimal version possible.
- Open your image in Photoshop.
- Go to Image, then click Image Size.
- In this box you will have to put “300” in the Resolution section and at least “2000” in Height.
- Then, make the selection of the image you want to vectorize in Photoshop.
How to select in Photoshop?
If you are not very familiar with the Photoshop tools, it is important that you know the variety of selection options that this software offers you.
- Rectangular frame and Elliptical frame: They make selection shapes with a geometric shape.
- Lasso Tool: It is perfect for making a selection in Photoshop in a detailed and precise way. This, in turn, is accompanied by the following options: ‘Polygonal Lasso Tool’, ‘Magnetic Lasso Tool’, ‘New Selection’, ‘Add to Selection’, ‘Subtract from Selection’ and ‘Intersect with Selection’ .
- Magic wand: It is used to select pixels from a range of similar colors with a single click.
- Quick selection: This tool takes texture and color into account to select areas of the image. After using this option, you have the possibility to increase or subtract from the selection.
I’m done selecting my image in Photoshop, now what?
Turn your image into an illustration
Once you have the selection of your image you can continue with the vectorization process.
1. Move your selection to another layer with CTRL+J
2. Select this new layer and go to Filter, then click Stylize and select Oil Paint
3. Change the Stylized value to 5; Cleaning to 4; Scale to 3; Bristle detail at 4; Angle to 0 and finally Brightness to 0.2. Click Ok.
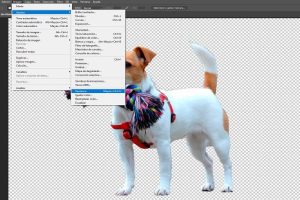
4. Then, you will have to go to Image, Adjustments and select the Desaturate option.
5. Now you will have to create a level layer, for this you will have to click on the ‘Create fill or adjustment layer’ button in the Layer menu and select Levels.
6. Click the square button at the bottom to only work on our image layer.
7. Once again select the ‘Create fill or adjustment layer’ button and click on Posterize. And repeat the previous step on this new layer.
8. The number that appears in the levels will determine the amount of colors in the edited image. If you put two, you will make a black and white image, while if you select 3 or more, you will get shades of gray. We will work with 3.
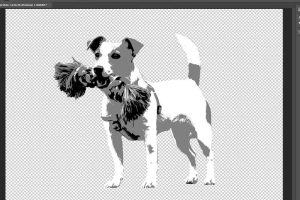
9. Double click on the Levels layer, in order to adjust the density of each color. You can change the values in order to add more contrast to your image.
10. Then, you will have to select both skins and your image. For this hold down SHIFT and click on the layer of the edited image.
11. Right click and select Merge Layers.
12. For the second time go to the Oil Painting option that we worked on in previous steps and assign the following values: 10 to Stylized and 5 to Clean. This last step is optional to optimize the appearance of your image.
How to make a path in Photoshop step by step?
You have already managed to transform an image into an illustration, now the time has come to learn how to make strokes in Photoshop. To facilitate this step you can change the name of your layer to ‘Base’, with this ready we can start working.
- Double click on ‘Base’ and in the Layer Style window, go to Blend Options and here we will change the ‘Blend if’ values.
- Move the slider until you only see the white color of your image.
- Hit CTRL+J to duplicate the layer and click ‘Convert to Smart Object’.

How to vectorize in Photoshop?
You’re very close to learning how to vectorize in Photoshop! Now pay attention to the next steps.
- To select this layer hold down CTRL and click on the layer.
- Pick a selection tool and click inside the selection, then click the ‘Make Work Path’ option and change the value to 1.5.
- Click on ‘Create fill or adjustment layer’ and select Solid Color.
- Select the white color and click Ok. You can rename this layer to ‘White’.
- Then delete the duplicate layer.
- You now have a white vector layer! You can check it by clicking on the image with the Direct Selection tool.
Now, it’s time to repeat this step for the number of colors you’ve selected for your image. In our case, it was three colors.

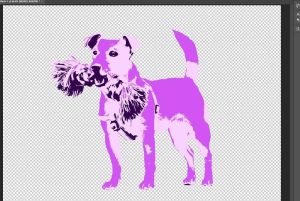
How to change colors in Photoshop?
Now that you have the vectors for each color in your image, you can play with the colorization in Photoshop. It is very simple! Click on the small square that has the layers you created for each color.
And, if you want to change the appearance of your image a bit more, you can add a stroke in the Layer Style box. Just remember to double click on the layer you want to edit.
How to import to Illustrator?
Did you manage to vectorize in Photoshop and now you want to continue working with your image? Remember that you also have the option to import into Illustrator and continue your changes there. Lean on this Adobe Suite program to improve each of your digital products. What is it you should do?
- Go to Files and click Save As.
- Give your work a name and select the .eps option, then click Save.
- Finally, you can open Illustrator and open the file you saved from Photoshop.
What are the most common vector formats?
We previously mentioned the importance of saving your projects or designs in vector formats so that you can later modify, send or print it.
But now, we will detail the most common formats and what their differences are.
- .EPS : This is the proper format for vector images, however, it is not used for designs or the web. In case you want it for these media, it is necessary to save it in JPEG, GIF or PNG.
- .SVG : Unlike .EPS, it is common to use it for the web, since it is compatible with browsers and does not overload servers.
- .AI : This will be the own format that will be generated when you work in Adobe Illustrator, so it cannot be used in another program, so it is not recommended if you want to share the project with someone else.
- .PDF : It could be said that this format is one of the most complete because it has the particularity that it can be used both on the web and for printing. Although to this is added, that it allows vector images and those of bitmaps.
As a plus at this point in the article we can tell you that in case you want to know if your logo is vectorized it must have one of these formats. Remember that, when the logo is not vectorized, you will not be able to take it to backgrounds that are not white and the file will weigh more when it is sent to the client by email.
How can vector images be used?
You may think that vector images can only be used for logo designs, letters or anything in the field of digital marketing or advertising, but the reality is different, it also covers other spaces in the real world.
The truth is that learning to vectorize images can be useful in multiple tasks that can range from architecture to technology:
- Currently, geographic systems scan images of areas, which are then vectorized to create more detailed maps of any area.
- While, in architecture, vector images are used to manipulate plans and share them digitally, this is possible after scanning.
- These types of images are also useful for recognizing patterns, since optical technology helps convert signatures and handwriting into vectors that can then be digitized.
As you will see, learning to vectorize images with Photoshop can help in multiple episodes of life and they can provide you with extra skills and additional knowledge that you can take advantage of at any opportunity.
Final tips
That’s the whole process to learn how to vectorize in Photoshop! We leave you some final tips to make the most of your new image.
- Now that you know how to vectorize in Photoshop, you’ll get every image in high quality. Get the most out of your graphics by exporting in good quality formats, such as PNG, and with an appropriate image size.
- Always try to remove unnecessary layers from your work, this will help you during the editing process. You can also group your layers by similar features or blocks of an image.
- Always try to use high quality images to perform this process. It will make your selection process in Photoshop easier, and the end result will also look much better.
- Photoshop is specialized in creating images for social networks, advertisements, and will ensure that they are optimized for the web format.
- If you want to create a website mockup, this program may be your best option, since the use of layers will help you edit the interface and thus you will be able to display any screen resolution.
That is all! We hope that this article on how to vectorize in Photoshop will be very useful for your next works. If you want to go much deeper into the use of this software, check out our, you will soon master the program perfectly.
Keep stay with us fabtekno.com to get more interesting article.