
Nowadays, Facebook has been one of popular Social Media, in this article we will show how to upload photo to Facebook: Step by step guide
Table of Contents
1. Login to Facebook

First of all, you must enter your Facebook account. On the main page of Facebook in Spanish enter your email next to your password and then click on the Enter button . Once you have entered, continue reading the next step.
If you don’t have your own Facebook account yet and want to learn how to share photos, first read this guide on how to create a Facebook account. Once you have created it, you can return to read this guide to upload photos.
2. Start uploading a photo

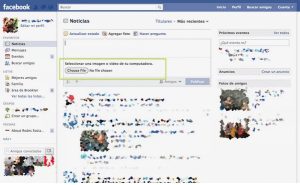
When you enter Facebook you will see the updates and news that your friends and favorite pages have recently shared.
To start the process of uploading your photo, you must click on the text that says Add photo that appears in the upper area, next to Update status
3. Options to choose your photo

Once you’ve clicked Add Photo , you’ll be presented with three options: Upload Photo or Video , Use Webcam , and Create Photo Album .
Upload Photo or Video allows you to choose a photo or video that is already saved on your computer.
It is also the simplest option, since it will allow you to upload a single photo. She will then appear in the Wall Photos album , which groups all the photos you upload one by one to your Facebook profile. This is a good option if you have photos you’ve taken and saved with Instagram , Snapchat , Snapseed, EyeEm , or VSCO , to name a few apps.
Using a webcam instead gives you the opportunity to instantly take photos or record a video using your computer’s webcam, if you have one.
Create photo album will allow you to upload several photos at once, include their details and create an album with them.
Then continue reading the next step to upload a photo to Facebook. If you have changed your mind and want to share more than one photo, continue reading this other guide that will teach you how to create an album with photos on Facebook .
4. Select the photo
After clicking on “Upload photo or video choose file” then Choose file ) to start searching for your photo among the files on your computer.
5. Choose the folder or directory
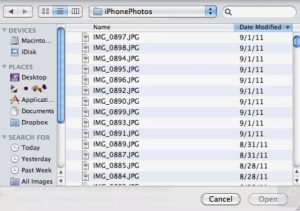
In this pop-up window you will be able to find the folder that contains the photo you want to upload. Once you have chosen it, you must click on “Open” Open
6. Write the description
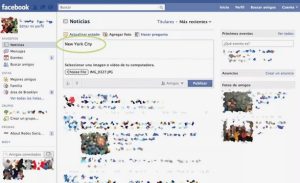
When you have already chosen the photo to upload, you will see the Facebook News section again. Now you have the option to add a description for the photo. You can leave it blank if you want, but it’s always good to add information so your contacts know what the photo is about or where it was taken. In the example the chosen description is “New York City” Before posting your photo, I recommend you read the next step.
7. Choose who will see your photo

This step is important since you can choose who will have access to your photo to upload photo to facebook. if you choose “Public Friends Personalized Friends Post”
8. Your photo has been published
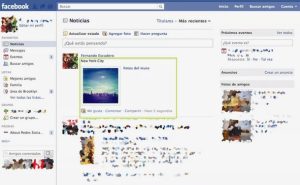
At this moment, your photo has already been published
You will then see in your Recent News that the photo has already been published along with the previously written description. I recommend you click on the photo to see more possible options.
9. Options after publishing

After clicking on the photo that you have just published, you will see in the lower part of it a series of options that Facebook gives you.
On the right side you can tag people or objects present in the photo, make it your new profile photo or delete it if you think it’s better not to share it. The lower buttons will also allow you to rotate the photo if its orientation is not correct.
Always stay with us fabtekno.com to get more interesting article.